
Basement-Window Sash Painting in Vancouver
Posted on September 14, 2026 by The Vancouver Painters Team
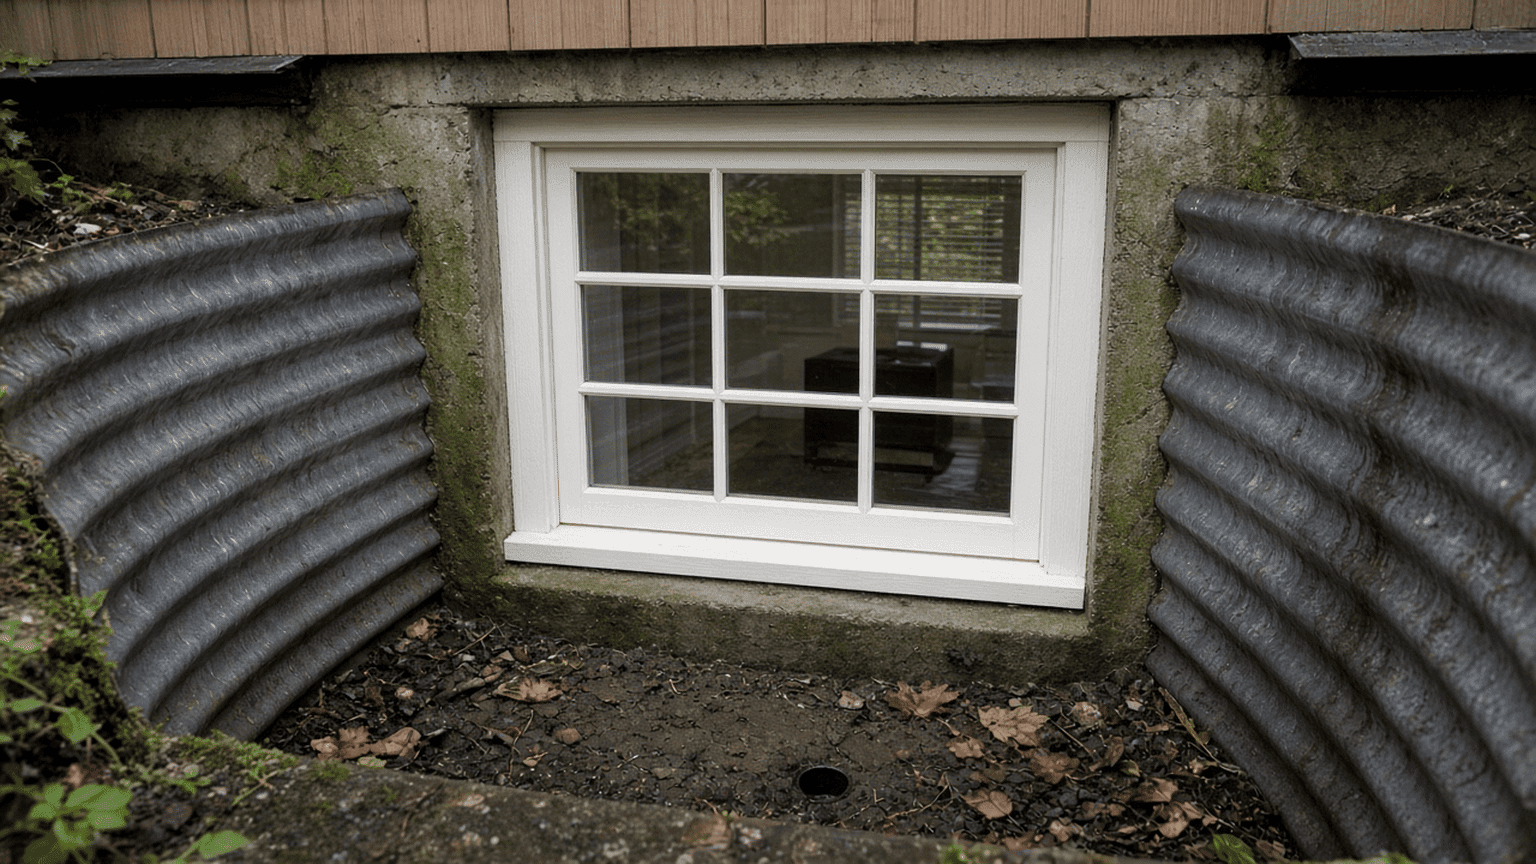
Quick answer: A Vancouver basement-window sash and well-side trim can usually be repainted when the sash, sill, stool, and well-facing casing are sound, dry, and free of active rust-through, rotten wood, or standing water in the well. Resolve mildew, failed glazing, and moisture defects before coating. Keep the window-well liner, the well-floor drain, an egress ladder, and the surrounding foundation masonry out of a face quote unless they are listed, choose a washable exterior system that can take weather and splash at grade without trapping moisture or sealing weep openings, and allow enough drying and cure time before the occupied path or the egress opening returns to daily use.
A basement-window sash sits in a tighter splash pocket than an above-grade window trim package or a house front door. Rain and soil hit the sill at grade, debris collects against the well-side trim, a downspout can wet the same sash all winter, the operator still has to open the sash, and the household still wants the side path open. A useful estimate should identify every included plane, liner and drain exclusions, occupied path staging, and return-to-egress cure timing rather than simply say “paint the basement window.”
This guide covers painted basement-window exterior sashes, well-side casing, stools, sills, stops, and any short well-facing trim that belongs to the same grade opening. Above-grade casings follow exterior window-trim painting. The surrounding splash-course follows foundation and parged-wall painting. Corrugated soil-retaining walls follow window-well liner painting. Solid grade-set service doors follow crawl-space access-door painting. Grade-set grate faces follow crawl-space foundation-vent painting. Wall-mounted dryer, gable, meter, and hose-bib faces follow exterior vent and utility-box painting. Interior below-grade rooms follow basement painting. Roof-edge openings follow soffit and fascia painting.
Name each basement-window sash and well-side trim surface before pricing
Homeowners often assume “basement-window painting” means the window-well liner, the foundation masonry, or the interior basement reveal. A component list makes quotes easier to compare:
- Sash: The painted sash leaf that holds the glass and may tilt, slide, hopper, or stay fixed — the visible well-facing leaf, not the buried liner
- Well-side trim: The painted well-side casing, stool, sill, stops, and returns that finish the opening on the well face
- Glazing and stops: Painted glazing compound, beads, or stops that finish the glass edge on a wood sash
- Hardware: The painted or masked lock, operator, track, and stay that must still move after coating
- Excluded liner and drain: The corrugated liner, rim, flange, well-floor, and drain belong with window-well liner painting, not this sash quote
- Excluded interior reveal: The interior stool, jamb, and basement wall — those follow the interior room guide
- Excluded egress ladder: An egress ladder or step that must stay usable — usually masked, not flooded with enamel
- Excluded vent grate and access door: A crawl-space foundation-vent grate or a solid access-door leaf
- Excluded masonry and yard work: The surrounding foundation splash-course, lattice skirt, downspout, covered porch, front step, gate, or garden shed unless those items are separately quoted
Specify whether the scope includes every sash face, the well-side trim, the stool, the sill, and whether hardware is coated or masked. A full exterior painting project may include a basement-window sash as a line item, but those details should still be listed separately from window-well liner painting, foundation painting, or above-grade window-trim painting on the same property.
Inspect for rust, mildew, and a dry well before preparation
Paint should not conceal unresolved rust, rotten sill wood, failed glazing, standing water on the well-floor, or a moisture path that is wetting the basement-window. Check each basement-window in daylight from the path and, where safe, from the interior side that sees the back of the sash. Look at the sunny face and the shaded north wall, and take a close view of each sash rail, sill, stool, weep opening, and any stained foundation return before cleaning or sanding removes clues.
Look for:
- Soft, rotten, or rust-through metal on a steel sash, or a wood sill that has pulled away from the masonry
- Peeling, bubbling, or blistering paint on the hidden bottom rail of a sash, at the splash band at grade, or along the well-side trim
- Green, grey, or black mildew film that returns after ordinary wiping on a shaded basement-window or north-wall sash
- Standing water on the well-floor, a blocked drain, or debris packed against the sill
- Recurring moisture stains under a basement-window, condensation on the glass, or irrigation wetting the sash
- Failed caulk or open joints where well-side trim meets the foundation masonry
- Cracked, loose, or heavily overpainted glazing compound on a wood sash
- Painted-over weep openings, track, weatherstripping, or an operator that no longer moves
- A factory-finished vinyl or aluminum sash that a homeowner has grouped with site-painted trim
- An egress ladder, foundation-vent grate, or access-door leaf that a homeowner has grouped with the sash
- Vinyl, aluminum, steel, wood, or mixed-metal sash faces that need a compatible system rather than leftover fence paint
- An older or unknown coating that may need hazardous-material assessment before disturbance, especially on previously painted wood or metal
A painter can document visible coating and surface conditions but should not certify egress clearance, drain performance, or window operation. A rotten sill, rust that has opened a hole, a wet stain that tracks behind the masonry, failed insulated-glass condensation, and a drain that still holds water after dry weather need assessment by the appropriate qualified trades before coating. Older coatings deserve caution before sanding or scraping — ask about testing or safe-work methods when the coating age is unknown. Recurring coating failure is covered in our guide to bubbling and peeling paint in Vancouver.
Review weather, occupied-path staging, and adjoining sightlines before choosing a system
Basement-window sash work fails schedules for reasons that differ from an above-grade window-trim package or a window-well liner. The sash sits in a splash pocket at grade, debris and moisture collect on the sill, and the side path is often the only occupied walk past the masonry.
Clarify before production:
- Whether every sash face, the well-side trim, the stool, and the sill stay dry enough in the forecast window, and how long the occupied path must stay off the splash band
- Whether soil, mulch, or irrigation will be pulled back from the sill, and whether the egress ladder stays usable or is taped for a written window
- Whether foundation, lattice, covered porch, downspout, or liner colour should be coordinated or left as a separate phase
- Whether the visible sash face, the well-side casing, the stool, the sill, and every hardware edge stay in scope or are masked only
- Whether the surrounding foundation masonry, the well-floor drain, and the corrugated liner are a separate job rather than part of this coating package
- Whether wood, aluminum, steel, vinyl, or mixed metal needs more than one product system
- Whether a factory-finished sash is meant to keep its finish so nobody coats a track or operator that should still move
- Whether a basement-window at grade needs extra drying time after rain before anyone coats the bottom rail and sill
If coatings fail on the same north-wall sash, sill, or grade splash band, plan better cleaning, moisture limits, and exterior products before relying on a new topcoat alone. Seasonal timing is covered in our best time to paint exteriors in Vancouver guide and the paint before rainy season checklist. A dedicated exterior window-trim guide remains the companion when the opening is above grade; basement-window sash work needs its own well-facing trim, egress, and opening-safe plan.
Decide what belongs in the painting scope
Basement-window sash work often sits next to liner, masonry, drain, or path tasks. Clarify boundaries early:
- Refresh sound painted surfaces: Clean, dull, prime where needed, and recoat finished sash, well-side trim, stool, and sill faces that are dry enough for the specified exterior system.
- Repair and then paint: Reset limited glazing, treat surface rust, or replace a short sill return after any leak, soil pile, or movement source is resolved.
- Include every sash face carefully: Confirm whether the exterior sash face, the bottom rail, the well-side casing, the stool, and the sill are coated, or only the street-facing trim.
- Exclude the liner, drain, and interior reveal unless quoted: The corrugated liner, well-floor drain, interior basement reveal, egress ladder, a foundation-vent grate, a crawl-space access-door leaf, and foundation splash-course belong with their own scopes unless those items are separately quoted.
- Coordinate colour with the house and arrival: Plan foundation, covered porch, front door, and lattice sightlines rather than leaving a mismatched leftover sash on the masonry.
- Keep liner, vent, door, and porch work separate: A window-well liner package, crawl-space foundation-vent, access-door, downspout, exterior gate, and covered porch are different moisture, access, and product jobs.
Joint sealing that belongs with painting is covered in our guide to exterior caulking before painting in Vancouver. A rotten sill, a rust-holed steel sash, and a wall stain that tracks into the entry are a repair or specialist issue, not a thicker paint problem, and isolating a wet grade basement-window on an occupied path costs more to stage than a dry interior wall patch. A basement refresh is the interior companion when the room behind the sash is in scope; this page stays on the exterior sash and well-side trim.
Preparation determines whether the finish will last
Basement-window sash metal and wood collect mildew on a shaded bottom rail, debris and soil film on the sill, splash at grade, and film on hardware that becomes an adhesion problem under a new coat. Painting over that contamination can cause poor adhesion or a streaky finish when cool Vancouver daylight rakes a freshly coated sash beside weather-exposed foundation parging.
A condition-specific preparation sequence may include:
- Confirm the occupied path or side walk has a written plan so nobody has to force a wet splash edge, and that each egress ladder and operator stays clear of over-spray
- Confirm the forecast window and that the sash, well-side trim, stool, and sill can stay dry through coating and early cure
- Confirm surfaces are dry enough for the specified system after any recent rain, wash, or mildew cleaning, and that the well-floor is not holding water
- Pull soil, mulch, and debris back from the sill, empty leaves from the sash rails, then clean the sash, trim, and sill with a method suited to mildew, grit, and light rust — often a controlled wash rather than aggressive blasting. See pressure washing before exterior painting
- Scrape or sand loose coating and feather sound edges without grinding debris into the path, neighbouring glass, a covered porch, or a garden shed
- Dull glossy retained finishes without damaging adjacent foundation masonry, a lattice skirt, or an unpainted railing
- Fill appropriate dents, treat surface rust, reset limited glazing, and open finish joints after the substrate is ready
- Spot-prime stains, repairs, bare wood or metal, adhesion-risk sash rails, and the grade splash band
- Caulk appropriate finish joints after the substrate is ready, stopping short of egress ladder mounts, weep openings, track gaps, and joints that must remain a drainage or operating gap
- Final grit, mildew-residue, soil, and cobweb removal before primer or finish coats — a basement-window sash needs a second pass after sanding because debris falls onto the occupied path and the well-floor
Do not assume a basement-window sash can be painted the morning after rain, with a well-floor still wet, or with soil still piled against a live foundation band. Surfaces and the sill need to be dry according to the product requirements and site conditions.
Protect the occupied path, glass, and egress opening carefully
Basement-window sash painting is as much about keeping a usable occupied path and a civil garden edge as it is about the coating. Protection, grade staging, and an egress-safe plan should be written before production starts.
Plan for:
- In-place staging that keeps sash interiors, glass, track, and egress ladder rungs clear of over-spray
- A temporary walk so the household is not forced past a wet basement-window or through a wet splash band
- Covered porch, front door, and neighbouring glass kept clear of over-spray, especially on a windy wall face
- Delivery, pet, and play-path controls during coating and early cure
- Temporary warning if the basement-window sits on the only dry edge after rain
- Egress, weep, and operator clearances so nobody paints a sash shut or seals a gap that the well still needs for drainage
Whether the sash faces are painted in one closure or sequenced so one arrival stays open should be written into the estimate. Over-spray and roller spray show quickly on a covered porch, front step, and nearby gate. If the side wall is the only occupied walk to the garden, the estimate should say how access will be managed while coatings dry.
Choose colour, sheen, and products for weather, sash material, and a tight well
Basement-window sash faces need finishes that look calm under mixed daylight, resist mildew on a shaded bottom rail, and stay usable beside rain, splash, and a daily path. Product and sheen choices should reflect wood versus metal versus vinyl, cleaning needs, and how soon an egress sash will be opened after the work.
Common planning points:
- Soft sash colours often keep a basement-window from reading as a bright pit better than a high-contrast accent on every well-side trim face
- Washable exterior systems suit north-wall sash faces and sill returns that take moisture
- Sash rails, stool edges, and the grade band usually need a harder-wearing enamel-style trim system than a broad fence field
- Sheen should balance cleanability and surface-flaw visibility on raking well light — a high-gloss sash can flash every brush mark and every rust patch
- Colour on the sash and well-side trim should still sit comfortably beside the foundation, covered porch, and lattice
- Weather-exposed wood, aluminum, steel, vinyl, and mixed sash faces need an exterior system rated for the substrate, not leftover interior enamel or leftover fence stain by default
- Dark colours on a thin metal sash can raise heat-absorption risk; ask before assuming a deep accent is safe
- A factory-finished vinyl or aluminum sash is often left uncoated; confirm before treating the leaf as site-painted trim
- Hardware, track, and operator parts are often masked so the sash still opens after cure
Do not assume leftover fence stain or leftover gate paint is automatically right for every sash surface. A shaded bottom rail, a sill that stays wet, and a grade-prone splash band can change the system. Masonry bands follow the foundation and parged-wall checklist. Under-deck screens follow the lattice checklist. Corrugated soil-retaining walls follow the window-well liner checklist. Grade-set grate faces follow the foundation-vent checklist. Solid service doors follow the access-door checklist. Wall-mounted hoods follow the vent and utility-box checklist. Roof-edge openings follow the soffit and fascia checklist. Vertical pipes follow the downspout checklist. Horizontal terrace boards follow deck and fence staining. Above-grade casings follow the exterior window-trim checklist.
Plan weather windows, recoat time, and return to path use
Vancouver basement-window sash faces can stay cool, shaded, and slow to dry after coating, especially on a north wall with limited airflow and a well pocket that still takes splash at grade. Recoat and cure windows should be written for the actual temperature, humidity, and forecast on site, and for how long the occupied path or garden must stay off the sash.
Ask the contractor to document:
- How the sash, well-side trim, stool, and sill will be kept dry during and after coating without trapping moisture under plastic against a wet basement-window or masonry pocket
- Whether a temporary arrival or side path can stay in daily use, and for how long after the final coat
- Recoat timing for sash faces, every well-side return, the stool, the sill, and any hardware meeting edge
- When the household can return to the side walk and garden path beside finished surfaces
- When an egress sash or ladder can be used without softening the finish
- Any odour or access expectations if the run shares a tight walk or a front step
Light household use of a different side path can come sooner than sending garden splash across a freshly coated sash or operating a wet operator. Plan more drying time rather than less if the wall is cool, shaded, or poorly ventilated, and keep the face ventilated as specified before daily path use returns. Late-summer and early-fall windows are easier than waiting for the rainy season.
What affects basement-window sash painting cost in Vancouver
Basement-window sash pricing usually turns on sash count, well-side trim detail, rust and sill handling, mildew and splash-band cleanup, liner and drain exclusions, exterior products, occupied path protection, and return-to-use cure timing more than a simple “paint the basement window” line. Factors that commonly change an estimate include:
- Total basement-window sash, well-side trim, stool, and sill count on a compact side-wall or path-adjacent footprint
- Wood, steel, aluminum, vinyl, or mixed repair, rust treatment, glazing reset, stain blocking, or mildew treatment required before coating, especially on a north wall or grade band
- Whether a window-well liner, foundation splash-course, well-floor drain, foundation-vent grate, access-door, downspout, or soffit opening is excluded, masked only, or quoted as a separate job
- Occupied-access protection, soil pull-back at grade, debris removal from the sash rails, and temporary-walk controls before daily path traffic returns
- Garden-face versus street-face-only coating, and whether every sash face and well-side return is included
- Product system for washable exterior durability, mildew resistance, or a harder-wearing metal enamel
- Number of colour changes and house, porch, or masonry return matching
- Weather-window and extended cure planning before access and egress use return
Use our exterior painting cost guide for Vancouver for broader pricing context, then compare line items rather than headline totals. If the same property also hosts window-well liner painting, foundation painting, access-door painting, foundation-vent painting, vent and utility-box painting, soffit and fascia painting, downspout painting, covered porch painting, front-step painting, gate painting, fence staining, or a garden shed refresh, price those scopes clearly rather than folding them into a basement-window sash number.
Common basement-window sash painting mistakes
- Painting over mildew film, debris on a sill, unresolved rust, wet wood, or a blocked drain
- Skipping thorough cleaning of the sash rails, the north wall, the hidden bottom rail, and the grade band
- Coating a window-well liner, a foundation-vent grate, or a crawl-space access-door leaf as if they were the same trim
- Sealing a weep opening or painting an operator or track shut on a basement-window
- Treating a grade sash as the same job as exterior window-trim painting, window-well liner painting, or a covered porch
- Folding the liner, the well-floor, or a foundation splash-course into a sash quote without a trade boundary
- Using leftover interior paint on a weather-exposed sash
- Coating a factory-finished vinyl or aluminum sash with a generic exterior paint
- Using a glossy, high-glare paint that flashes every brush mark and every rust patch
- Using a flat, hard-to-clean wall paint on splash-prone grade faces
- Sending the household back along the same occupied path before the written cure window
- Ignoring foundation, covered porch, and lattice sightlines from the walk
- Blocking the weep openings or track gap with caulk
- Matching quotes by price alone without matching surface lists, liner exclusions, and grade staging
Questions to ask when comparing estimates
Ask each contractor:
- Which basement-window sashes, well-side casings, stools, sills, and hardware edges are included?
- Which window-well liners, foundation splash-courses, well-floor drains, foundation-vent grates, access-door leaves, downspout pipes, and soffit openings are excluded?
- Are wall sightlines, irrigation at grade, and egress clearances excluded, masked only, or quoted separately?
- What mildew, stains, rust, failed glazing, or moisture issues were identified on the hidden bottom rails and sill band?
- Which defects need window, masonry, or drainage specialist work first?
- How will dirt, loose paint, gloss, mildew, debris, and light rust be addressed before coating?
- Is rust-inhibiting primer, bonding primer, a vinyl-safe system, or a washable exterior paint part of the plan?
- How will the occupied path, plants, and neighbouring garden edge be protected during grade work?
- Will the egress ladder, track, and operator be masked, and how will the glass stay clear?
- How long must the household stay off the walk or path, and when can an egress sash be opened, after the final coat?
- Which products, colours, sheens, and coat sequence are proposed?
- What weather-window, recoat, cure, and return-to-use instructions apply?
- How will cleanup, touch-ups, final inspection, and workmanship warranty be documented?
Use our house painting quote comparison guide to check insurance, payment terms, change orders, cleanup, exclusions, and warranty language alongside these sash-specific questions.
Basement-window sash painting FAQs
Can you paint a basement-window sash while living in the home?
Yes, if occupied-access staging, weather, soil pull-back, and cure timing are clear. Many Vancouver projects paint the street-face trim first, then the sash and well-side casing in a short closure, or they isolate one side path so the covered porch arrival can stay open. The estimate should state how long the household stays off the path and when an egress sash can be opened.
Should a sash be matte, eggshell, or satin?
Sheen is secondary to whether the product is intended for exterior wood, metal, or trim. A quality washable low-sheen exterior system can look calmer and hide more imperfections under mixed light, while a slightly higher sheen may wipe more easily after mildew cleaning on a north-wall sash. Avoid a high-gloss basement-window that flashes every patch. Surface condition and the product data matter more than a universal sheen rule.
Is basement-window sash painting different from liner, foundation, or above-grade window-trim painting?
Yes. Window-well liner painting emphasizes the corrugated soil-retaining wall, rim, and flange. Foundation and parged-wall painting emphasizes the masonry splash-course. Exterior window-trim painting emphasizes above-grade casing, head trim, and sills on the wall face. Basement-window sash work emphasizes the well-facing sash, well-side trim, stool, sill, weep and operator clearances, occupied path staging, and products that can take weather and mildew without trapping moisture. Keep those expectations written into the estimate rather than assuming one quote covers the sash, the liner, and the foundation.
Do wood, steel, and factory-finished sashes need different paint?
Often yes. Wood sash faces may need primer, glazing reset, and a compatible exterior topcoat. Steel sash faces may need rust-inhibiting primer. A factory-finished vinyl or aluminum sash can be colour-sensitive and warranty-sensitive. A mixed opening should list both systems. The estimate should state whether every sash face, the well-side trim, the stool, the sill, and the hardware edges are included at all.
How long before the path and egress opening can be used after painting?
Follow the current product data and the contractor's written instructions. Light household use of a different side path can come sooner than sending splash across a wet sash or opening a freshly coated operator. In a cool, shaded, or poorly ventilated grade pocket, plan more cure time rather than less, and keep the run ventilated as specified before daily path use returns against finished surfaces.
Get a basement-window sash painting estimate in Vancouver
Photograph every foundation elevation in daylight from the path, close views of each basement-window sash, well-side trim, stool, and sill, any rust, rotten wood, or failed glazing, the well-floor and drain, the weather-exposed splash band at grade, and adjoining window-well liner, foundation, access-door, foundation-vent, dryer-vent, soffit and fascia, downspout, covered porch, front step, gate, railing, fence, or garden shed sightlines. Note whether the window-well liner or lattice skirt are planned in the same phase.
Start a free, no-obligation exterior painting estimate or call +1 (604) 260-1613 for 24/7 estimate requests. We help homeowners in Vancouver and across the Lower Mainland connect with a painting partner for a clearly defined basement-window sash and well-side trim painting scope.