Why Paint Bubbles or Peels on Vancouver Homes
Posted on June 25, 2026 by The Vancouver Painters Team
Quick answer: Paint bubbles or peels when the coating loses its bond to the surface. In Vancouver, the most common causes are trapped moisture, painting before a surface is dry, failed exterior caulking, mildew or chalk left under the paint, poor sanding, and coatings that were applied in the wrong temperature or weather window.
Bubbling paint is more than a cosmetic problem. A blister on siding, trim, stucco, a bathroom ceiling, or a basement wall can mean water is getting behind the coating or that the previous paint system never bonded properly.
Before repainting, it is worth slowing down enough to find the cause. Scraping and recoating the same spot without solving moisture, prep, or product issues often leads to the same failure returning next season.
What bubbling paint usually means
A paint bubble is a pocket where the coating has lifted away from the surface. Sometimes the pocket is dry and caused by heat or adhesion problems. Other times it is soft, damp, or stained because moisture is pushing from behind.
Common signs to note before calling for a quote:
- Bubbles that appear after heavy rain
- Peeling below windows, gutters, or roof edges
- Blisters on sunny south or west-facing walls
- Soft paint around bathrooms, laundry rooms, or basement walls
- Brown stains, mildew, or musty smells near the same area
- Paint that peels in sheets instead of small flakes
- Bare wood, chalky siding, or glossy old paint under the failed coating
Take photos before scraping anything. The pattern can help an estimator understand whether the problem is local surface prep, weather exposure, a leak, or a broader repaint issue.
Moisture is the first thing to rule out
Vancouver's wet climate makes moisture the most important cause to check. Paint can fail when water gets into wood, drywall, stucco cracks, open joints, or siding edges and then tries to escape through the coating.
Moisture-related paint failure often appears near:
- Window sills and trim
- Fascia, soffits, and gutter lines
- Door frames and thresholds
- North-facing or shaded siding
- Stucco hairline cracks
- Bathroom ceilings and shower walls
- Basement baseboards or exterior-facing corners
If the area feels damp, looks swollen, or keeps staining after it dries, fix the water source before painting. Paint can help protect a sound surface, but it cannot solve active leaks, condensation, rotten trim, or trapped moisture in a wall assembly.
For interior rooms with recurring humidity, compare the situation with our guide to moisture-resistant interior paint for Vancouver bathrooms, kitchens, and basements.
Failed caulking can start exterior peeling
Exterior caulking is one of the most common weak points on Vancouver homes. When sealant cracks, hardens, shrinks, or pulls away, rain can enter behind trim and siding. The paint may bubble nearby even if the visible caulk joint looks like the smallest part of the problem.
Inspect:
- Window and door trim seams
- Vertical siding joints
- Gaps around vents, pipes, and exterior fixtures
- Horizontal ledges where water sits
- Fascia joints and corner boards
- Areas where old caulking is stained or loose
Loose caulking should usually be removed and replaced before primer and finish coats. Painting over failed sealant can hide the opening temporarily while still allowing water to keep moving behind the surface. For more detail, read our exterior caulking before painting guide.
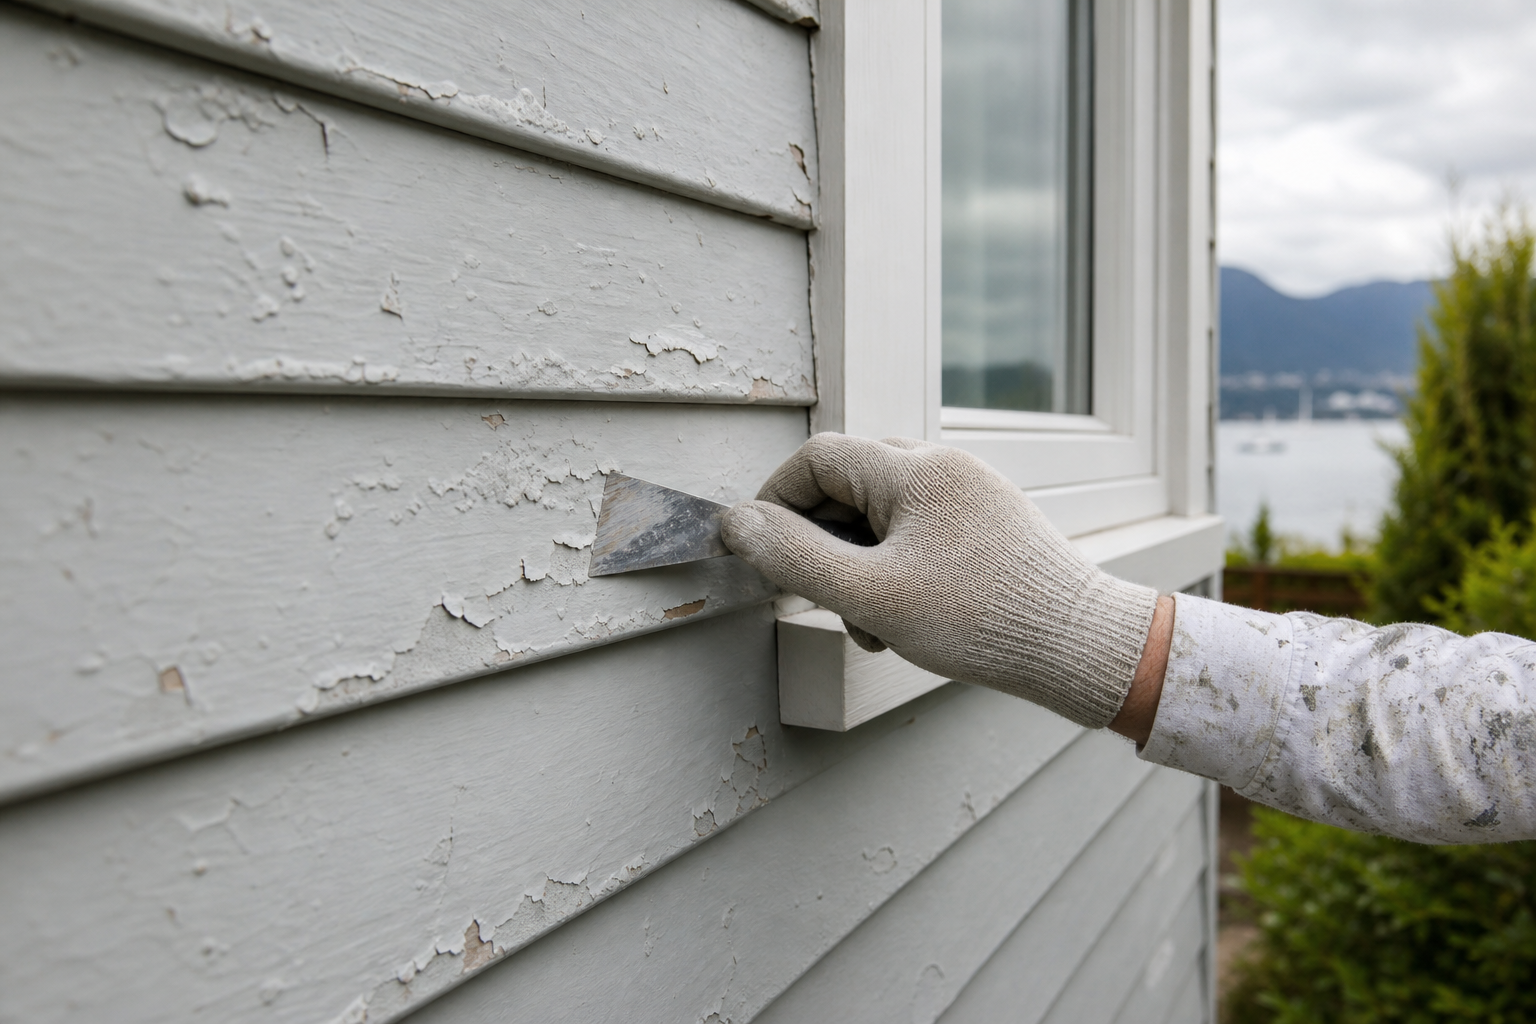
Poor prep can make new paint fail early
Not every blister is caused by a leak. Sometimes paint bubbles because the surface was not clean, dull, dry, and sound when the coating was applied.
Prep problems include:
- Painting over mildew, pollen, road dust, or chalky residue
- Skipping primer on bare wood, patched drywall, or stains
- Painting over glossy old paint without sanding
- Leaving loose paint edges instead of feather-sanding them
- Applying paint to damp siding after washing
- Using the wrong product over an incompatible old coating
This is why a good quote should describe preparation, not only colour and number of coats. On exterior projects, washing, scraping, sanding, caulking, drying time, and spot priming all affect how long the repaint lasts.
If you are planning an exterior repaint, our guide on pressure washing before exterior painting in Vancouver explains how cleaning and drying should fit into the prep sequence.
Weather and sun exposure matter
Paint can blister when it is applied in the wrong conditions. Vancouver's painting window can shift quickly because a wall may look dry while shaded wood, stucco, or trim is still holding moisture from overnight rain.
Risky conditions include:
- Painting too soon after rain or washing
- Coating a surface that is hot from direct sun
- Painting when temperatures drop too low overnight
- Applying paint before dew has dried
- Painting just before a damp evening or rainy forecast
South and west elevations can also age differently from shaded walls. Sun can heat dark colours, soften old coatings, and expose weak adhesion faster. A professional exterior schedule should consider both rain and heat, not just whether the day looks clear.
For seasonal planning, see the best time to paint your home's exterior in Vancouver.
When peeling is a warning sign
Small isolated peeling can sometimes be handled with targeted scraping, sanding, primer, and touch-up. Wider failure may point to a coating system that has reached the end of its life.
Consider a broader repaint inspection when:
- Multiple sides of the home are peeling or chalking
- Bare wood is visible on trim, fascia, or siding edges
- Caulking has failed in several places
- Previous touch-ups keep failing
- The colour has faded unevenly
- Peeling returns soon after every repair
- Paint is failing near known leak or drainage problems
Our guide on how often Vancouver homes need repainting can help you decide whether the issue is a small repair or part of a larger repaint cycle.
How a painter should repair bubbling paint
The exact repair depends on the cause, but a durable fix usually follows a careful sequence.
A typical process may include:
- Identify whether moisture, caulking, heat, or poor adhesion caused the failure.
- Fix active leaks, drainage, ventilation, or rotten material before painting.
- Remove loose or blistered paint back to sound edges.
- Sand and feather the edges so the repair does not telegraph through the finish.
- Clean mildew, chalk, dust, or residue from the surface.
- Let the substrate dry fully.
- Prime bare wood, stains, patched areas, or problem surfaces with the right primer.
- Apply compatible finish coats in suitable weather or room conditions.
The most important step is the first one. If the quote does not explain why the paint failed, ask what the crew will do differently so the same spot does not bubble again.
Questions to ask before approving the repair
Before hiring a painter for bubbling or peeling paint, ask:
- What do you think caused the failure?
- Does the area need moisture testing, drying time, or repair before paint?
- Will loose paint be scraped and feather-sanded?
- Which primer will be used on bare wood, stains, or patched areas?
- Is caulking replacement included?
- How will mildew, chalk, or glossy old paint be handled?
- What weather window is needed for exterior repairs?
- Is this a spot repair, or does the surrounding wall need repainting for a consistent finish?
These answers also make quotes easier to compare. Our Vancouver painting quote comparison guide explains how to review prep, primer, repairs, schedule, and warranty details line by line.
Get peeling or bubbling paint checked
If you are seeing paint bubbles, peeling trim, stained siding, or recurring bathroom ceiling failure, request a free painting quote or call +1 (604) 260-1613 for 24/7 estimate requests. Share photos of the failed area, when it appears, and whether it gets worse after rain, showers, or direct sun so we can help match you with the right painting partner in Vancouver, Burnaby, Richmond, North Vancouver, West Vancouver, and the Lower Mainland.